Notes on Picking Pin Tumbler Locks
Matt Blaze
University of Pennsylvania
7 November 2003 (revised 21 November 2016)
|
NOTE: These notes are intended primarily for students in my
security seminar; a few of the references here are locally specific
and may be confusing to others. Most of the content, however, is
generic, and security researchers and practitioners, students of
locksmithing, surreptitious entry specialists, and others with an
interest in this subject may find it helpful, especially in
conjunction with other resources.
|
Mechanical locks (and techniques for defeating them) are inherently
interesting to many scientists, engineers, and others, and an
understanding of the principles for evaluating and techniques for
attacking locks, in addition to being useful in its own right, can
provide subtle insight into security more generally. Pin-tumbler lock
picking has long been among the common skills of the security
community.
The first step toward learning to defeat locks is a thorough
understanding of how they work, where their security comes from, and
how their design and manufacture introduces potentially exploitable
vulnerabilities. A detailed introduction to locks is well beyond the
scope of this document; we assume here that you already understand, or
have access to, the basic principles. This is intended only as a
supplemental, practical guide.
In this document. we focus specifically on the conventional "pin
tumbler" lock, which is the most common commercial and residential
design used in the United States. Many of the principles can be
applied to other keyed lock types, although sometimes the techniques
and tools must be adapted. Some pin tumbler locks incorporate "high
security" features, including secondary locking mechanisms and
features intended specifically to frustrate picking. While some of
these features can be defeated with conventional picking tools and are
covered here, picking high security locks generally requires
specialized tools and techniques (often designed for a specific brand
or model of lock) and are beyond our scope here.
There has been quite a bit written, on the Internet and in print,
about lock picking. While some of the literature of this subject is
quite good, much of it is amateurish, apparently written to appeal to
an "underground" audience and not especially rigorous or complete.
Some of it is just factually wrong, or obviously based only on
speculation.
Probably the best book I've found on picking locks is the Gerry Finch
Manual of Lock Picking, which unfortunately appears to be out
of print as of this writing. It is aimed at locksmith practitioners
but has a cogent discussion of principles as well as technique. If
you can find a copy for sale, get it. (Some of the approach in this
document is influenced by that of the Finch book).
Another tutorial reference is The National Locksmith Guide to
Picking and Impressioning by Robert Sieveking. It's aimed at
working locksmiths, and has a broad discussion of picking techniques
and principles, albeit with less depth than the Finch book.
An excellent (and currently available) reference is Marc W. Tobias'
Locks, Safes and Security. The book is an encyclopedic guide
to mechanical locks, how to evaluate them, and how to defeat them,
aimed primarily at investigators, law enforcement and intelligence
operatives. It's 1400 pages, costs about $200, and is available from
amazon.com
or directly from its
publisher at www.security.org. It is a
worthwhile investment for anyone with a serious interest in the
subject, and repays careful study.
For those unfortunate neo-anti-Luddites who refuse to acknowledge the
value of anything not available on the Web, I suggest, at a minimum,
reading the MIT Guide to Lockpicking, which, while not
perfect, has the virtue of being free (and readily available online).
See www.lysator.liu.se/mit-guide/mit-guide.html.
A word of warning however: some of the terminology in the MIT
Guide is non-standard and can be a bit confusing. For example,
the method it calls "scrubbing" is called "raking" by almost everyone
else (it's not something I suggest you spend much time on, at least at
first, by the way). The pick design it calls a "rake" is called a
"hook" by the rest of the world (it's the kind of pick you'll be using
most). But the MIT Guide does cover most of the basics
and is a quick read.
What is Lock Picking?
"Lock picking" is usually defined as manipulating tumblers to operate
a lock without the use of, or access to, a correct key. Although
somewhat romanticized by popular media and culture, in reality the
significance of lock picking is usually dwarfed by other, more
practical threats. Other classes of attack, not discussed here but at
least as worthy of study and scrutiny, include lock decoding,
which is concerned with producing a working key based only on access
to the external interface of the lock, lock bypass, which
aims to unlatch the underlying locking mechanism without operating the
lock at all, and forced entry, which, as the term suggests,
involves the destructive application of force to the lock or its
surroundings. And of course there is the surest and fastest method of
all: the use of the correct key. Any physical security assessment
should consider defenses against the full range of potential threats,
not just vulnerability to lock picking.
From the attacker's perspective, too, lock picking is rarely the most
efficient, most economical, fastest, or easiest method of entry.
Picking locks requires skill, practice, and the use of rather unusual
(and not widely available) tools. Few burglars can afford to risk
exposure during the time required to pick even relatively easy locks,
and unexplained possession of lock picking tools is often considered
prima facia evidence of criminal intent. Criminals generally
prefer either procuring a key or forced entry for speed, certainty,
and stealth, notwithstanding whatever property damage or evidence is
left behind. Surreptitious entry (e.g., for espionage or law
enforcement surveillance) is likewise often best accomplished by
obtaining a key or through the use of specialized decoding or bypass
tools designed to quickly and quietly defeat the locks used by the
target.
Lock picking is useful and worth studying for its generality and
simplicity. The principles and skills of lock picking, once mastered,
can be applied against the vast majority of commercial pin tumbler
locks, and the basic tools, if somewhat unusual, are quite simple.
Lock picking is a core skill of the locksmithing trade and is also of
value to those evaluating, investigating, and studying security
systems.
Picking depends on weaknesses in the implementation of locks
-- small manufacturing imperfections -- rather than fundamental,
abstract design flaws that would be present no matter how carefully
made the locks might be. (Contrast this, for example, to the
weaknesses in the keyspaces of master keyed systems, which are
independent of the physical qualities of the locks themselves).
However, because the precision with which locks can be manufactured is
limited by physical processes, materials, economics, and usability
considerations, exploitable weaknesses almost always exist in
practice. (That said, better quality locks can be difficult and time
consuming to pick.)
Picking Pin Tumbler Locks
The modern pin tumbler lock is quite simple, dating back to ancient
Egypt but not commercially mass-produced until the middle of the 19th
century. The basic design consists of a rotatable cylinder tube,
called the plug, linked to the underlying locking mechanism.
Around the circumference of the plug is a shell, which is
fixed to the door or container. Rotation of the plug within the shell
operates the locking mechanism. In the locked state the plug is
prevented from rotating by a set of movable pin stacks,
typically under spring pressure, that protrude from holes in the top
of the opening in the shell into corresponding holes drilled into the
top of the plug. Each pin stack is cut in one or more places
perpendicular to its length. See Figure 1. (In practice, the cuts are
produced by stacking pin segments of particular lengths, not by
actually cutting the pins; hence the term "pin stack.")
With no key in the lock, all the pin stack cuts rest within the plug.
When a key is inserted into the keyway slot at the front of
the plug, the pin stacks are raised within the plug and shell.
(Wards in the keyway restrict the keys that can be inserted.)
The plug can rotate freely only if the key lifts every pin stack's cut
to align at the border between the plug and shell. The plug/shell
border is called the shear line. See Figure 2. The plug will
be blocked from rotating if any pin stack is lifted either not far
enough (with the cut still in the plug below the shear line) or too
far (with the cut pushed above the shear line and into the shell); to
rotate, all pin stacks must have a cut at the shear line. The height
(or cut depth) of a key under each pin stack position is
called its bitting; the bitting of a key is the "secret"
needed to open a lock. A key that is bitted to the wrong depth in
even one pin position will not operate the lock. Typical commercial
and residential locks have five or six pin stacks (although four and
seven aren't unheard of), with from four to ten distinct cut depths
used on each.
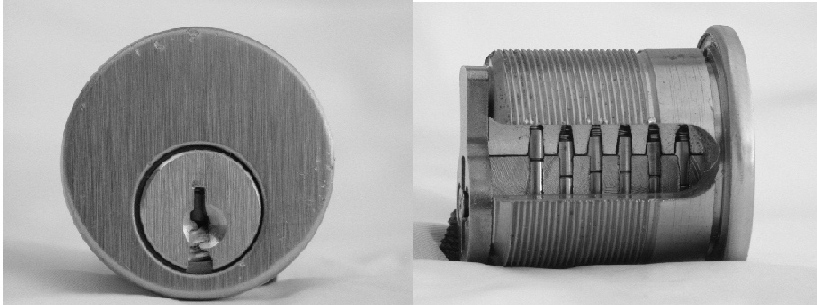
Figure 1. A pin tumbler lock cylinder. Left:
Cylinder face, the lock's "user interface." Note the keyway,
which is cut into the plug, which in turn sits inside the
shell. Right: Side view, with part of the shell and
plug cut away to expose the six pin stacks. Note the border
between the plug and shell, which forms the shear line, and
the cuts in each pin stack resting within the plug.
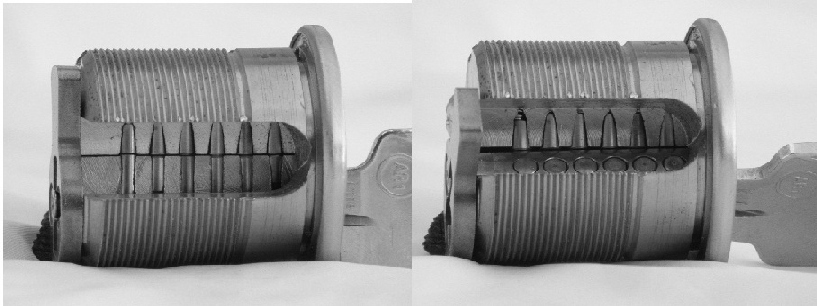
Figure 2. Pin tumbler lock with a correct key inserted.
Left: The correct key lifts the pin stacks to align the cuts
at the shear line. Right: With all of the cuts at the shear
line, the plug can rotate freely within the shell. Here the plug has
been turned slightly toward the camera, so that the tops of the pins
in the plug are visible.
In an ideal lock, all of the pin holes in the plug would be in perfect
alignment with the corresponding holes in the shell, the centerline of
the plug would be exactly parallel to that of the shell, and all of
the pins would be exactly the same diameter. If you tried to rotate
the plug of such a lock without a key in the keyway, the top pin
segment of each pin stack would block the plug at exactly the same
number of degrees of rotation; each pin stack would contribute equally
to preventing the plug from turning. In practice, of course, locks
aren't perfect: the pin holes in the plug are slightly out of
alignment with respect to the shell and the pins and pin holes are
each of a slightly different diameter. These imperfections are very
small -- as little as .0001 inches in some cases -- but they are what
allow us to manipulate ("pick") locks open without using the correct
key.
Pin tumbler lock picking consists of raising the cuts on each pin
stack to the shear line, one by one, until the plug turns freely. In
particular note that because the pins are slightly out of alignment,
as the plug is turned gently, only the pin stack that is most
out of alignment actually prevents further rotation. The top pin of
the most misaligned pin stack becomes "pinched" at the shear line
between the plug and the shell. If this pin stack is slowly pushed up
with torque applied to the plug, eventually its cut will reach the
shear line and the plug will turn a bit more. The top pin of that pin
stack will be trapped above the shear line, the bottom pin will fall
freely, and now a new pin stack (the next most misaligned one)
prevents further rotation.
The basic algorithm for picking locks is remarkably simple:
- Apply a small amount of torque to the plug.
- Repeat until lock turns:
- Locate the pin stack that's being pinched
at the shear line (it resists slightly when pushed up)
- Continue to push that pin stack up until its cut reaches
the shear line and the plug turns slightly.
That's it -- now you know almost everything there is to know about
lock picking. The rest is just technique -- locating and recognizing
the state of each pin stack, manipulating the pins, applying torque to
the plug. It's hard to learn these skills all at once on
off-the-shelf commercial locks, but that's what many people who try to
learn lock picking end up doing (before giving up in frustration).
It's much easier to learn each skill in isolation, using locks
specifically set up for the purpose. In the lab there is a collection
of "training locks," mounted on boards, for practice. These locks are
specially pinned to facilitate a more step-by-step approach.
The basic skills of pin tumbler lock picking include selecting the
proper tools, manipulating pins through the keyway, applying torque,
and recognizing the state of each pin.
Lock Picking Tools
Success in lock picking is mostly a matter of skill. Good tools are
important, to be sure, but once a few basic tools are available the
student of lock picking is usually better off investing in new locks
on which to practice rather than in new picking tools.
Picking tools are designed to perform one of two basic functions:
manipulating pins and turning the plug. Two tools -- one for each
function -- are used simultaneously when picking a lock.
Picks probe and lift the individual pin tumblers through the
keyway, while torque tools control the degree and force of
plug rotation. Both the pick and the torque tool also amplify and
transmit feedback about the state of the lock back to their user.
(Other names for the torque tool are turning tool, torque
wrench, torsion wrench, and tension wrench.
The term "tension" is mechanically inaccurate here, since the tool's
function involves torque, not tension).
A wide variety of lock picking tools are commercially available from
locksmithing supply vendors, often packaged in elaborate (and
expensive) kits containing a baffling array of oddly shaped
instruments of dubious utility. A few basic tools are sufficient to
pick the majority of commonly used locks. Unfortunately, many of the
commercially available lock pick kits consist mostly of useless
gimmicks. Worse, they often omit the designs that are of the most
practical value.
The proper pick and torque tool selection depend on the shape of the
keyway, the features of the lock, the picking technique, and the
individual preferences of the user. Examples of some of the better
quality commercially available picking tools can be found at www.mattblaze.org/photos/misc/picks/.
Picks
Over the years, the locksmithing industry has settled on a number of
"standard" pick designs. Unfortunately, these designs are less than
ideal, and many of the "standard" picks are too large to fit and move
comfortably in common lock keyways. Many experienced locksmiths and
expert lock pickers prefer "home made" tools to the commercial
selections, especially for picking unusual and high security locks.
The shape of the tip is the most obvious difference between picking
tools, with hooks, half-diamond, ball, double ball, wave, sawtooth and
other styles available. It is not clear what some of these picks are
intended to actually do. For most of the picking methods discussed
here, in which tumblers are manipulated one by one, a "hook"-style
pick is generally used. A functional pick kit should contain several
different size hooks to accommodate a range of different keyway shapes.
Other differences between picks, aside from the shape of the tip, are
the material, finish, width and thickness of the tang shaft, and the
shape and material of the handle. Much of this is simply a matter of
individual preference, but certain choices here can also have an
impact on performance. The pick must be strong enough to resist
bending or breaking while lifting pins, yet the shaft must be small
and thin enough to maneuver freely around the keyway without disturbing
other pins. Spring steel or stainless steel, between .020 and .035
inches thick, are typical materials. Many manufacturers outfit their
picks with elaborate and supposedly "ergonomic" handles, but these
often hinder performance as much as they might enhance it. (Bulky
handles tend to dampen the transmission of feedback from the lock, and
the "handle" part of the pick isn't actually where most of your grip
should be in any case.)
Torque tools
The selection of the torque tool is just as important as that of the
pick, but, again, commercial pick kits often fail to include a
sufficient range of sizes and designs to allow good control and feel
across the range of common locks. The traditional torque tool is made
from stiff, flat spring steel, bent at a 90 degree angle to provide a
small blade that fits in the keyway and a long handle to which torque
is applied.
In general, the torque tool should be as thick as possible while still
fitting in the keyway, and of a width sufficient to provide good
control but without interfering with the picking tool's access to the
pins. If the torque tool is too thin, it will tend to be "springy"
and will absorb much of the fine movement and control needed to
successfully pick better quality locks. Avoid so-called
"feather-touch" and spring-loaded torque tools altogether. The tool
should amplify, not dampen, the rotation of the plug.
Longer handles are as a rule better in torque tools; the farther from
the plug the torque can be applied, the easier it is to detect and
control fine movement. There is a tradeoff, of course, since a longer
handle may be difficult to maneuver around obstacles.
Torque tools may be oriented vertically (with the handle in line with
the keyway) or horizontally (with the handle perpendicular to the
keyway); different people have different preferences. Vertical
orientation requires a 90 degree twist in the blade. Most commercial
torque tools are designed for horizontal orientation.
Another style of torque tool has two "prongs" that fit in the top and
bottom of the keyway, with a cutout between them for the pick. This
style of tool is especially useful for holding open automotive locks
that have spring-loaded dust covers. The tool must have a good fit to
be effective, however. Falle-Safe Security makes a set of
vertically-oriented two-prong torque tools designed to fit snugly in a
range of different pin tumbler keyways. They allow very precise
control over torque, especially when employing advanced picking
techniques that involve a slight reversing of the rotation of the
keyway.
Your tools
|
Note: The author does not stock, sell, or distribute lock tools; if
you're not a student in my seminar, please don't ask -- I can't help
you. A variety of picking tools are available through most locksmith
supply distributors.
|
The basic recommended pick set for this course includes four picks and
four torque tools. The picks are made by Peterson International (a
locksmithing tool vendor in upstate New York with manufacturing
facilities in South Africa). Their web site, with descriptions of the
tools, is at www.peterson-international.com.
Three of the picks are of a "hook" design. They include a standard
hook (called the "Hook" in Peterson's catalog), a larger hook (the
"Gem"), and a deep curve (the "Reach"). The fourth pick is a "rake"
of a long sawtooth design (the "Ripple"). The picks are available
with blue plastic handles. black rubber handles, or red foam handles.
I made the torque tools out of Peterson's .025 inch spring steel of
different widths. Two of the tools orient the handle perpendicular to
the keyway and two orient the handle vertically.
The three hook picks in this kit are sufficient to manipulate the vast
majority of pin tumbler locks found in the US. Most of the esoteric
pick designs in the huge, overpriced sets you see on the web and from
locksmith suppliers are useless, and eventually end up being discarded
in favor of the basic hooks.
That said, the Peterson hook picks are a bit too large to fit
comfortably in more tightly warded keyways, especially those found on
higher-security locks. (Locks in Europe also often have tighter
keyways than typical US locks.) The "advanced" pick set for this
course includes the Peterson picks plus the LAB model LPT015 kit,
which contains a collection of six smaller picks (they're
double-ended, giving total of 12 different picking tips), three
double-ended standard torque tools in various sizes, and a "fork"
two-prong torque tool (for automotive locks). LAB is a lock pin and
locksmith tool manufacturer. Their web site is at www.lab-lockpins.com.
The LAB picks can comfortably maneuver around even very tight keyways,
and are among my personal favorites.
While the LAB picks are quite nice, their small size makes them rather
delicate and easy to bend or break, especially as you're learning how
much lifting force and torque are involved. The Peterson picks are
more sturdy, at the expense of being bulkier (but they still fit
easily in many of the keyways you'll be picking). For most locks,
especially as you're starting out, a workable compromise is often the
smaller Peterson hook.
Tutorial Exercises
|
If you're not in my seminar, the references to the lock boards in
the lab don't apply, of course; you will need to configure your own
training locks to follow these exercises. However, your efforts
un-pinning and re-pinning locks will be time well spent -- you will
progress much faster than you would if you tried to start out picking
fully pinned cylinders. You will need a small set of cylinders in
various keyways, a board or vice to hold them in while you practice,
and a small re-pinning kit (extra pins and springs and a "follower"
tool). There is a more detailed discussion of configuring training
locks at the end of this document.
|
The following is a series of self-paced exercises to help you master
the basic techniques of pin tumbler lock picking. In the lab you'll
find a collection of small (12 inch by 18 inch) lock boards, each
containing six specially pinned locks with a given keyway. The
keyways include Arrow ("AR1"), Ilco-Schlage-multiplex ("SX"),
Schlage-C ("SC"), and Yale-8 ("Y1"). While there are literally
thousands of different keyways in commercial use in the United States
and thousands more abroad, these four give a fairly representative
sample of the different kinds of wardings (and pin manipulation
problems) you are likely to encounter in common (non-high-security)
locks.
Each board is labeled with its keyway, and each lock cylinder on a
board is labeled with the number of installed pin stacks (from one to
six) and the keying code for its pinning. The locks are drilled for
up to six pins. The six character keying code gives the pinning from
the front of the lock to the back, with a "-" for a missing pin stack
and a digit for a pin that is installed. Small digits represent short
bottom pins (that must be pushed up more to reach the shear line);
large digits represent longer bottom pins (that need only be pushed up
a bit). The boards should be held vertically (e.g., in a vice or
against a wall on a table) when used, simulating a typical door. Do
not hold them in your lap. (And whatever you do, please don't remove
them from the lab without checking with me first!)
It is very important when you do the exercises that you not move on to
the next until you have completely and comfortably mastered the
exercise you're working on. That means being able to reliably pick
the lock, both clockwise and counterclockwise, and being confident
that you know how you opened it. A good rule of thumb is to be able
to complete an exercise at least ten times clockwise and then
another ten times counterclockwise before considering it complete
and moving on. It can become very tempting to "cheat" a bit here and move
ahead the moment you get a difficult lock open the first time, but that will
only make the rest of the course that much harder.
You should be relaxed, comfortable and able to concentrate when you do
these exercises. Lock picking involves fine movement and control, and
if you're in a hurry, uncomfortable, frustrated, or distracted you
will not make progress. Take frequent breaks, and don't try to
complete the whole course in one day. Everything will still be there
tomorrow.
Exercise 1: Selecting Tools and Manipulating Pins
Find the board with the six "Arrow AR1" keyway locks. This keyway is
common in commercial and residential locks in the US, and is close in
shape and size to a number of other common keyways, including that
used by Kwikset, a very popular (and easily defeated) line of US
residential locks. The keyway is relatively open and easy to move a
pick through, making it a good starting point.
Using the five or six pin lock, find a pick that lets you locate and
lift each pin across its full range of motion without disturbing
adjacent pins too much. (Make sure the lock is in the locked stated
when you do this; if it's already been picked, rotate the plug until
you hear the pins snap back into place.) Lift each of the pins from
front to back. Try all your different picks. You'll probably end up
deciding that the small Peterson hook works best, but experiment with
all the picks.
Work your pick into the keyway and feel the pins. First count them,
making sure you find all five (or six). (One way to do this is by
lifting all the pins to their full height with an upside-down pick and
then slowly withdrawing it, listening for the sounds of the pins
dropping.) Now lift each pin individually and note what the spring
pressure feels like (you can pivot the pick off the front of one of
the horizontal wards in the keyway as you do this). The pins toward
the back may feel a bit different from the pins in the front. Take
your time with this. You should be able to confidently find each pin
and push it all the way up, without jamming the pick against anything
or moving other pins. Lifting pins is one of the basic actions of
lock picking, and it's worth taking the time now to become good at it.
It is important to develop a "mental image" of the internal state of
the lock, the locations of the pins and your pick, etc, as you
manipulate the pins. Intuitively visualizing the inside of a lock
takes a bit of practice, but will pay off as you start picking locks
in earnest.
Hold your pick as you would a pencil when you work the pins. (A
common mistake is to hold the pick as if it were a shovel.) Your
index and middle fingers should be touching the edge of the pick close
to where it enters the keyway. The pick handle should not be making
contact with the palm of your hand. See Figures 3 and 4.
Once you're comfortable with the AR1 keyway, move on to the "Ilco SX"
keyway locks and repeat the exercise. This keyway is a bit more
"open" (it's intended to allow several different key profiles to fit
in it), and so requires the use of a larger pick than the Arrow AR1
keyway does. You'll probably find the large hook or deep curve pick
works well here.
When you feel confident visualizing and using picks to maneuver around
the pins in the AR1 and SX keyways, you're ready to start actually
opening locks.
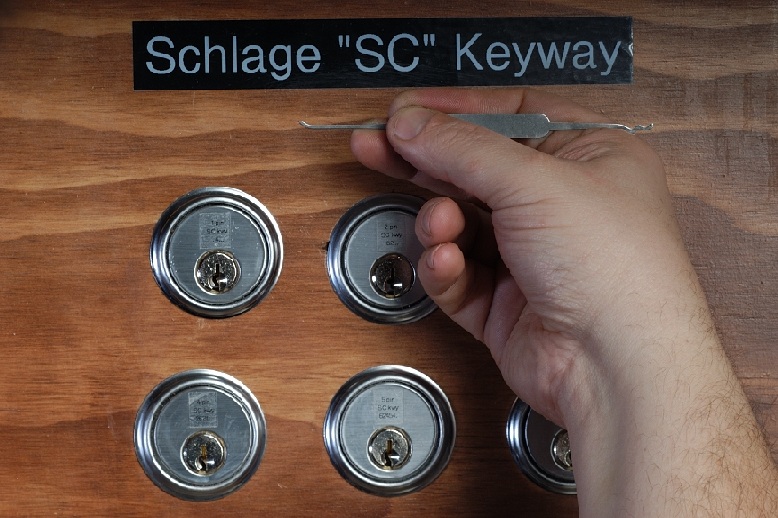
Figure 3. Holding a pick. Note that the pick should be held
mostly by the shaft of the tang, not the "handle." This allows better
control and feedback. A very tight grip is not required, nor is great
force used. This pick is a LAB double-ended "hook/rake" (held for use
with the hook end).
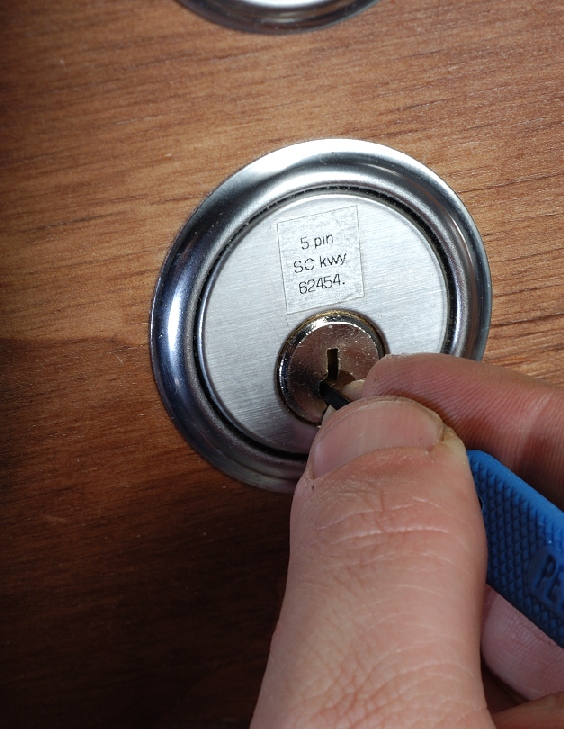
Figure 4. Manipulating pins. Find the ward directly under the
pins and pivot the shaft of the pick at the font of the keyway. Move
your fingers close to the keyway as you do this. This pick is a
Peterson "Hook" with a plastic handle.
Exercise 2: Applying Torque
Go back to the "Arrow AR1" keyway lock board and find the one pin lock.
Try each of your torque tools in the lock. Insert the tip of the tool
in the keyway, allowing enough room for your pick to enter and
manipulate the pins. The handle of the torque tool serves as a lever
to turn the plug. It is usually possible to insert the torque tool at
either the top or bottom part of the keyway.
I usually find that the very top of the plug, directly in
front of the pins, to be a good place to apply torque, but you have to
be careful that the tool doesn't touch the front-most pin. See Figure
5.
With the tool in the keyway, apply torque and try to turn the plug.
It won't turn, of course, because the cut of
the (single) pin stack is still below the shear line and its top pin is
preventing the plug from rotating. Now, while continuing to apply torque,
insert your pick and find and slowly lift the pin stack. You'll notice that
it resists more than it did in the previous exercise because its top pin is
pinched between the plug and the shell at the shear line by the torque
you're applying. In lock picking terminology, we say that the pin
statck is binding.
As you lift the pin stack with torque applied, eventually its cut
will reach the shear line, allowing the plug to turn; the top pin
will then be completely trapped in the shell, while the bottom pin stays
in the plug, no longer held down by spring pressure. (The numbers on the
front of the practice locks indicate the keying codes, from the
front-most pin stack to the rear-most. Smaller numbers correspond to
shorter bottom pins, which must be raised higher to reach the shear
line.)
Reset the lock by returning the plug to the vertical locked position
and try again but with torque applied in the other
direction. You have to be prepared to pick locks in either direction.
Some locks will open both clockwise and counterclockwise, but many will
only open when turned a particular way, depending on the configuration of
the underlying locking mechanism. (If you pick a lock in the wrong
direction you will have to either reset the lock and start over or use
a "plug spinner" tool to rotate the plug back fast enough that the
pins do not reset as they pass the 12 o'clock position.) As a general
rule, locks mounted on the left side of a door open clockwise, while
locks on the right side of a door open counterclockwise. There are
exceptions, however. Take note of the direction the keys turn on
doors you use to help develop an inituition about which direction to
apply torque.
Continue with the one pin lock, trying to apply less and less torque
each time. Learn to apply the minimum amount of torque needed to turn
the plug. Spend more time on this exercise than you think you need
to; most people never learn to properly apply the light touch needed
to pick better quality locks.
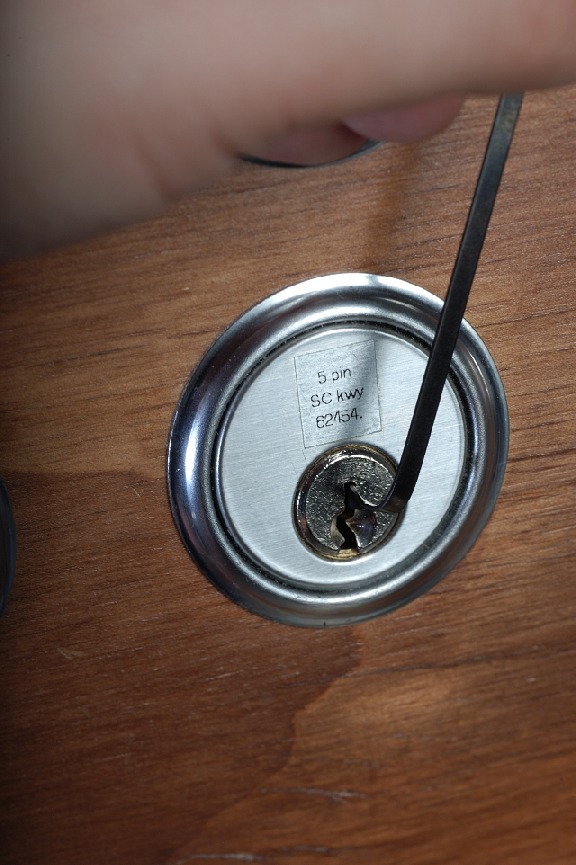
Figure 5. Applying torque. Several positions are possible;
here a vertically-oriented torque tool is used at the top of the
keyway. You must be careful to avoid touching the front-most pin with
the blade of the tool, but this position has the advantage of allowing
maximum room to maneuver the pick.
Exercise 3: Picking Two Pins
For this exercise, you'll be using the two pin AR1 lock.
Apply some torque to the plug and feel the two pin stacks with your
pick. One of them should feel springy, just as it did with no torque
applied. The other should give you a bit of resistance. If both feel
springy, you're not applying enough torque (which is unlikely). If
both resist, you're applying too much (the more likely mistake).
The resistant pin stack is the called the binding pin. It's
binding because it's the one most out of alignment in the direction
you're turning, and so its top pin is being pinched (gently) between
the plug and the shell.
While continuing to apply torque, slowly push the binding pin up.
Eventually, you'll reach a point where the plug will turn ever so
slightly and the pin will not go up any farther. You may hear a faint
"click." This is because you've pushed the cut (between the bottom
and the top pin) up to exactly the shear line. Now the top pin is
above the shear line and the bottom pin is below it. If you release
pressure with your pick while still applying torque, the bottom pin
will drop freely, and will not have any spring pressure if you try to
push it back up. When the plug turned slightly, it trapped the top
pin above the shear line, preventing it from re-entering the plug.
Now the plug is being prevented from moving by the next most
misaligned pin (which, in this case, is the other pin, since there are
only two).
Now (as long as you continue to apply torque) the other pin should be
binding. Push it up slowly as you did before. When you reach the
shear line, the plug will turn. Congratulations, you've picked the
(two pin) lock.
It's possible that the plug will turn as soon as you set the first
pin; if this happens, it's because you inadvertently lifted the other
pin with the shaft of your pick while you were working on the first
one. While this might have gotten the lock open, you just as easily
might have pushed the cut past the shear line entirely, preventing the
lock from opening altogether. Learn to pick this lock one pin at a
time.
Practice picking the two pin lock until you can do it easily and
naturally. Your goal is to learn to do this with the absolute minimum
amount of torque needed to bind the most misaligned pin enough to
distinguish it from the other one. Develop a light touch. In
particular, you should feel when you set a pin as much in the torque
tool as you do in the pick.
Now apply torque in the other direction. Chances are the two pins
will be reversed -- the formerly springy one will give resistance and
the formerly stuck one will be springy. (Why?)
Keep practicing with the two pin lock, trying to lighten your touch as
you do, and making sure you consistently can pick the pins one at a time.
Exercise 4: Recognizing Pin States
For this exercise, you'll be continuing with the two pin AR1 lock.
A pin stack in a lock being picked might be in any of four states:
- Unset/not-binding. The pin is not picked but is not the
currently most misaligned one. It feels "springy," as it
does when no torque is applied.
- Set/not-binding. The pin stack was already picked. It
moves freely up until it reaches the shear line, where it "hits a
wall" and can move no further.
- Unset/binding. The pin stack is the currently most
misaligned one. It feels "squishy," with more resistance than from
just the spring. If pushed up, it eventually sets and the plug
turns slightly (and the pin stack's state changes to set/not-binding).
- Overset/binding. The cut in the pin stack is past the shear
line. It feels much as it does when binding and unset, but will not
set (since a binding pin can only move up, not down). The lock will
never pick open in this state; you must release torque and start over.
Only one pin stack should be in a binding state at any given time, of
course. It's important to be able to distinguish among these four
states. Much of lock picking skill depends on testing pins stacks for
the purpose of finding which to push up next and assuring that no pins
are overset. For this exercise, you'll use your torque tool and pick
on the two pin lock to put the pins in each of these states to learn
what they feel like with your pick. These skills become very important
when picking better quality locks, so take your time here.
First, apply light torque (as you practiced in the previous exercises)
to the two pin cylinder and gently feel each pin. One of the pins
should be unset/binding ("squishy") while the other should be
unset/not-binding ("springy"). Find the binding pin and the
non-binding pin. Now release torque and try again, but this time lift
the pins as little as you can when you test them, while still
distinguishing between the two states. Repeat this exercise until you
can reliably distinguish between a binding and a non-binding pin with
very little lifting. (Excessively lifting a pin while testing it
increases the risk of oversetting it or disturbing adjacent pins.)
Now re-apply torque and set the first binding pin. Once you do this,
one of the pins will be in the unset/binding state while the other
(the one you set) will be in the set/not-binding state . Again,
repeat the exercise with the aim of learning to distinguish between
these states with as little lifting as possible.
Finally, lift the pin that sets first very high before you
apply torque. This will overset the pin. Learn what a pin in that
state feels like. It becomes distinguishable from an unset/binding
pin stack when you try to set it; while it binds, it does not set, no
matter how much further it is lifted.
Exercise 5: Three Pins
Continue with the AR1 lock board.
Once you've mastered the two pin lock and can distinguish reliably
among pin states, you should have little trouble with a three pin
lock.
You should already be able to distinguish between an unset pin that
isn't binding, an already set pin, and a pin that is binding. Observe
that after you set the first pin, your three pin cylinder has one pin
in each of three different states: set/not-binding, unset/not-binding,
and unset/binding. Practice distinguishing between the pin states and
then finish picking the cylinder. Remember to practice this several
times, in both directions.
If you inadvertently push a pin up too far or are applying so much
torque that more than one pin is binding, you may have an overset pin
instead. If this happens, you won't get the lock open until you
release torque and start over. An important skill when picking is to
recognize when this has happened so you don't waste time before you
start over.
Spend a lot of time playing with the three pin lock so that you can
recognize the pin states easily and naturally. Note that these locks
have been deliberately pinned with a short pin behind a long one.
You'll need to be careful not to disturb the long pin when you push
the short pin up.
Exercise 6: Four Pins and Up
Again, continue with the AR1 locks.
When you're comfortable picking the three pin lock (in both
directions) move on to a fourth pin, and when you've mastered that, a
fifth and then a sixth. As you work with locks more populated with
pins, it becomes increasingly critical to avoid accidently disturbing
the pins adjacent to the one you're working on. If you're having
trouble, you may be pushing adjacent pins up past the shear line as
you pick a pin, causing them to be overset even before they start to
bind.
Eventually, you'll be able to comfortably pick the locks with five and
six pins installed. As you progress, you should know the state of the lock
at all times: which pins are set, which aren't, which one is binding.
You should always know which pin you're working on at any given time.
Once you've picked a cylinder, you should know in exactly what order
the pins pick.
Note that while many locks pick predominantly back to front or front
to back, there are exceptions, and you may find that the binding pin
stack "jumps around" from the back to the front to the middle and so
on. Get in the habit of making a systematic "inventory" of the states
of the pin stacks after you set each new pin. Do not assume that the
next pin will be adjacent to the one you just set.
While a fairly wide range of torque will sometimes pick these locks,
try find the lightest torque that works. Better quality locks are
less forgiving of too much torque.
Exercise 7: Different Keyways
Once you've mastered the AR1 keyway locks, repeat exercises 2 through
6 with the "Ilco SX" keyway locks. This keyway is more "open" than
the Arrow, and there aren't really any "platforms" on which to pivot
your pick. The Peterson "Reach" deep curve pick works well for this
keyway, pivoting from the bottom of the keyway at the front.
When you've mastered the SX locks, try the "Schlage SC" keyway locks.
These locks add a new challenge: maneuvering the pick. Again, try to
find and lift all the pins with the different hook picks without
applying any torque. You may need to turn the pick a bit to fully lift
the pins. It will take a bit of practice to find just the right
technique. Become comfortable with this before you try picking this
lock with torque or you could bend or break your picks. You may find
one of the smaller LAB hook picks to be easier here than the larger
Peterson picks, although you can usually still pick this keyway with
the small Peterson hook.
Schlage SC is a very common keyway. You may well have one of these
locks on your house.
Finally, for a real challenge, try the Yale "Y1" keyway locks. The Y1
keyway is one of the toughest you are likely to encounter in real lock
installations in the US. Note how the wards extend across the front
of the pins; this is called a "paracentric" design in locksmithing
parlance. To pick this keyway, you'll need a small hook pick and a
bit of twisting as you lift. You'll probably want to use one of the
smaller LAB picks, although the small Peterson hook will sometimes do
with care and practice. You may want to use one of the smaller torque
tools as well, or put your torque tool in the bottom part of the
keyway instead of the (curvy) top.
With practice, even this keyway will eventually seem easy to maneuver.
Exercise 8: Using Rake Picks
So far, we've been picking locks "a pin at a time," with a single pin
stack set at the shear line in the sequence dictated by whatever
misalignments are present in the cylinder. Raking, in
contrast, is a class of picking techniques in which several pin stack
may be set at the shear line simultaneously. While pin-at-a-time
picking is usually the most reliable way to open a given lock (and the
skills used essential for mastery of other techniques), raking can
sometimes open a lock more quickly. Often raking is used to best
effect in conjunction with pin-at-a-time picking.
There are many different styles of raking, some of which entail the
use of special rake picks specifically designed for a particular
technique. You do not need to master them all, and it is certainly
not necessary to accumulate a large collection of different rakes.
However, it is worth experimenting with different rakes and raking
techniques to find one or two that work well for you.
The most comprehensive treatment of raking techniques I've found is in
the Finch Manual of Lock Picking, although other authors have
different perspectives on the subject. What follows is a brief
summary of several of the most popular techniques. Note that
excessive raking with any of these techniques will tend to overset
pins, so be prepared to release torque and start over from time to
time.
Sawtooth
Sawtooth rakes, such as the Peterson "Ripple" and the
Falle-Safe rakes, have 5 or more very acute peaks along the length of
the pick's edge. When inserted quickly in and out of the keyway and
rubbed along the bottoms of the pins, they tend to make each pin stack
"jump" rapidly. As the peaks hit the pin stacks, energy is
transferred from the bottom pins to the top pins, much like the action
of the cue ball in billiards. When the energy transfers, the top pin
moves up while the bottom pin slows down, and a gap is created between
the two pins. If the shear line is within this gap as torque is
applied, it may set. The multiple peaks allow several, or even all,
pin stacks to set simultaneously. (This, by the way, is the same
principle used by mechanical "pick guns" and by "bump keys").
Apply very light torque while energetically moving the sawtooth rake
in and out of the keyway. Do not push up hard against the pins; use
just enough pressure to cause the pin stacks to jump.
Rubbing
Many inexpensive locks are grossly misaligned, making them quite forgiving
of chaotic picking technique. Rubbing exploits this by
simulating several passes of pin-at-a-time picking in a few "strokes"
across the pin stacks.
While applying light to moderate torque, push and pull a gently
rounded rake pick from front to back and back to front along the pin
stacks. Vary the amount of lifting between strokes but do not force
the pins, lest you overset them. Alternatively, you can use the
rounded edge of an inverted hook pick instead of a special rake pick.
Jiggle Key Raking
Very "wavy" rake picks can simulate various key profiles, and can be
surprisingly successful at opening poorly-made locks.
Apply light torque while pivoting a long, wavy rake inside the lock,
inserting and removing it slightly as you go. If not successful,
invert the pick and try again with the inverted profile.
Reverse Picking
While pins are usually set by raising the cut from the plug to the
shear line, they can also be picked by first oversetting the cut to
within the shell and then lowering it to the shear line.
This technique requires a great deal of practice to master, but has
the surprising property of sometimes being more effective
against better made locks.
Using an inverted pick, raise all the pin stacks to their maximum
height. Now apply heavy torque, with the aim of pinching all
the bottom pins at the shear line. Gradually ease up on the torque,
allowing pins to drop one at a time. An oscillating motion with the
torque is often helpful here. Note that although heavy torque is
required, this technique also demands high sensitivity and control.
Exercise 9: "Final Exam"
The large board has locks with eight different keyways, representing
many of the most common keyway designs used in the US. There are locks
with two, five, and six pins in each keyway, but the keying codes
aren't labeled on them.
If you can pick all (or at least most) of the locks on this board, you
are well prepared against the typical locks installed in residential
and commercial buildings in the US. (In some areas, especially urban
centers, higher security locks are more common, but that remains the
exception rather than the rule).
Exercise 10: ("Extra Credit") Security Pins
Some lock manufacturers and locksmiths install special "security pins"
intended to resist lock picking. The most common security pins are
the "spool" and "mushroom" top pin designs, which are thinner in their
mid-section. These pins falsely set before they reach the shear line.
See Figure 6.
Spool and Mushroom Pins
Picking locks with spool and mushroom pins takes practice, both to
recognize them and to effectively neutralize them when they are
encountered. The first sign of spool and mushroom pins is that the
lock will appear to be picked, but will only turn a few degrees.
See Figure 6 for an example of a spool pin.
To determine which pin stacks have these pins, gently push up each
"set" pin. The pin stacks with regular pins will feel just as you'd
expect, with a hard stop when the bottom pin hits the shear line. Pin
stacks with partially set spool and mushrooms, on the other hand, will
feel a bit different. There will be a slight "backward" pressure on
the torque tool. To neutralize a partially set spool or mushroom pin,
reduce torque and push the pin up, allowing the plug to rotate
backward a bit as you do. (It is often helpful to do this with
"rocking" motion between the pick and the torque tool, gradually
increasing the degree to which the plug is allowed to rotate
backward). When the pin stack truly sets at the shear line, it will
feel like an ordinary set pin. Note that other pins may unset at this
point, and may have to be picked again.
An alternative technique, which I have not seen mentioned in the
literature, is to first determine which pin stacks have security pins
and which have regular pins (by picking normally and noting which
stacks are false set). Now release torque and start over, taking care
to pick all the pin stacks with spool/mushroom pins while leaving at
least one regular pin stack unset (this will require a light touch and
good sensitivity). When the final (non-security) pin is set, the lock
should open.
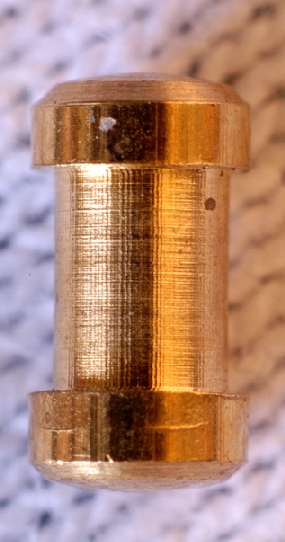
Figure 6. Abus "spool" top pin. The name comes from the
resemblance to an empty spool of thread. The thin midsection falsely
sets.
Serrated pins
Serrated pins can be very difficult to neutralize. See Figure 7 for
an example of a serrated pin. The serrated section tends to false set
and jam as long as torque is applied. (Some cylinders also serrate
the pin chamber itself, exacerbating the difficulty of picking).
If only serrated top pins are used, reverse picking may be successful.
If serrated bottom pins are used as well (as they are in, e.g.,
certain American brand padlocks), snap guns, bump keys, or sawtooth
raking are likely the only picking techniques that will succeed, especially
for the novice.
However, because they jam when false set, locks with serrated pins
tend to impression very well (impressioning is a decoding technique
that produces a working key based on marks left on a progressively cut
key blank).
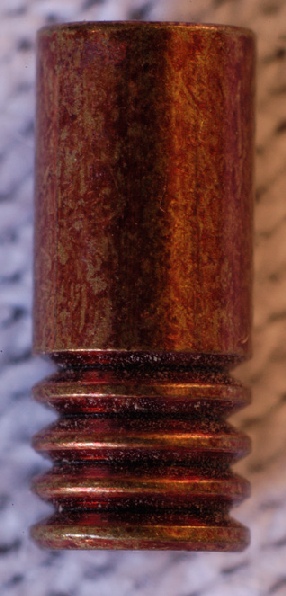
Figure 7. LAB Serrated top pin. The serrated section falsely
sets and jams as long as torque is applied.
Other Kinds of Locks
While the pin tumbler cylinder is by far the most popular door locking
mechanism in the United States, it is not the only kind of keyed lock
in common use. Other lock types include "European profile"
cylinders, master keyed locks, master ring and SFIC cylinders,
tubular pin tumbler locks, dimple-key pin tumbler locks, pin tumbler
locks with secondary locking mechanisms, wafer tumbler locks, disk
tumbler locks, lever tumbler locks, combination locks, and electronic
locks. While many of the principles of pin tumbler lock picking apply
or can be adapted to other mechanical lock designs, a complete
discussion of these locks and techniques for defeating them is beyond
the scope of this document. (Tobias' Locks, Safes and
Security is a good reference for this purpose.)
"European Profile" Cylinders
A common door lock mechanism in Europe uses a standardized "European
profile" lock module. These are typically pin tumbler locks, but
their orientation is "upside down" with respect to the convention for
locks installed in the United States. The pins are at the bottom of
the keyway rather than the top.
High security locks are more routinely installed in Europe than they
are in the United States. This may be a consequence of more stringent
European insurance standards for physical security.
Master-Keyed Pin Tumbler Locks
Most pin tumbler cylinders can be "master keyed" to allow more than
one key bitting to operate it. The usual scheme for master keying
involves using more than one cut in some or all pin stacks (this is
accomplished by adding additional pin segments). (This method of
master keying introduces fundamental vulnerabilities; see my paper on
the subject at www.mattblaze.org/papers/mk.pdf.)
Master keying does not introduce any significant complications for
lock picking. In fact, master keyed pin stacks are easier to pick
than those that are single-keyed; there are two chances to lift a cut
to the shear line. (If a picked master keyed cylinder is rotated 180
degrees, there is some risk of a very thin pin segment becoming
trapped at the top of the keyway, but this is rarely an issue in
practice).
Master-Ring and SFIC Cylinders
Ordinary pin tumbler locks have a single shear line (the boundary
between the plug and the shell). Master ring and
small-format interchangeable core (SFIC) locks, however, have
two shear lines, formed by a concentric plug-within-a-plug.
The two shear lines are keyed independently by a "double height" pin
stack, with one set of cuts keyed to each. Master ring cylinders
(which are no longer in common commercial production but were once
marketed by Corbin) use this mechanism to provide independently-keyed
master keying. SFIC cylinders (such as those made by Best), used in
large institutional lock systems, employ a similar mechanism to
provide two kinds of keys: regular keys that operate the lock and
control keys that unlock and remove the cylinder core itself.
See www.mattblaze.org/photos/misc/sfic/.
Master ring and SFIC locks can be very difficult to pick. Because
there are two independent shear lines, there is no way to control, or
even tell, at which shear line a given pin stack sets. If just one
pin sets at the "other" shear line, the lock will not open even though
all the pin stacks are picked. In a lock with six pin stacks with a
uniform chance of a pin setting at either shear line, the probability
of a picked lock actually opening is only 1/64. Picking techniques
for these locks involve the use of special torque tools designed to
put torque on only one of the two concentric plugs. Snap guns are
occasionally successful as well.
Tubular Pin Tumbler Locks
Tubular cylinders typically have four to eight pin tumblers arranged
in a circular pattern around the circumference of the plug. The
design is based on the late 18th century British Bramah lock
(still in production and use today). The basic principles of
operation are essentially the same as those of the standard pin
tumbler lock, except that the tumblers are exposed at the front of the
cylinder and a round ("tubular") key is used.
Tubular locks suffer from the same manufacturing imperfections as
other locks and so can be picked with essentially the same techniques.
However, the design of the cylinder requires the use of special tools
to manipulate the pins and apply torque. A popular style of tool for
these locks decodes them via impressioning techniques.
These locks are no more or less inherently secure than standard pin
tumbler locks, although the external exposure of their pins makes
picking them (and designing sophisticated picking tools for them)
somewhat simpler. However, some tubular cylinders (e.g. the
Ace-II lock and the tubular models of American-brand
padlocks) are made to very tight tolerances and use mushroom, spool,
and serrated security pins.
Dimple-Key Pin Tumbler Locks
A few pin tumbler lock products orient the key horizontally in the
keyway and use a flat key bitted with variable-depth holes ("dimples")
rather than the cuts used for the familiar "sawtooth" key. These
locks can be picked according to the same principles as used for
ordinary pin tumbler locks, but, again, different tools are used to
accommodate the different shape of the keyway.
Many dimple key locks also incorporate secondary high security locking
mechanisms. For example, Mul-T-Lock cylinders use special
"telescoping" pins that contain two independently keyed tumblers.
Secondary Locking Mechanisms
High-security locks often incorporate one or more secondary locking
mechanisms beyond that provided by the conventional pin tumblers.
Many of these mechanisms involve the use of a "sidebar" that must
retract before the plug can rotate. A variety of schemes are used to
key the sidebar. For example, Medeco locks use special
wedge-shaped bottom pins that are rotated into one of several possible
positions by the key cuts (which can be cut at different angles).
Each pins has a groove cut in its side at the position corresponding
to its correct rotation. The sidebar must engage these grooves in
order to retract and allow plug rotation. Schlage Primus
locks also use a sidebar. The Primus sidebar is keyed by additional
side tumblers that engage a secondary bitting cut into the side of the
key.
In addition to making picking more difficult, secondary locking
mechanisms are sometimes also intended to make it more difficult to
reproduce unauthorized copies of keys. Making keys for these locks
often requires the use of special equipment and unusual, proprietary
key blanks.
Wafer Tumbler Locks
Many inexpensive locks, especially low-security "cam" locks such as
those used to secure furniture and cabinets, do not use pin stacks for
their tumblers. Instead, they use flat "wafers," typically extending
across the full height of the plug. Each wafer has a large
rectangular cutout through its middle and through which the key
passes; the precise height of the cutout keys the wafer to different
bittings. If the wafer is set too low by the key, it blocks rotation
by extending out through the bottom of the plug, while if it is set
too high, it extends out the top. A correctly keyed wafer is flush
with the plug on the top and the bottom and allows rotation.
In general, wafer lock picking employs the same techniques and tools
as those used for pin tumbler locks. Most wafer locks are made to
very loose tolerances and have relatively open keyways, however, and
are very easy to pick. However, note that because the tumblers are a
single piece, sawtooth raking, snap guns, and bump keys are not
effective against them. These locks are often quite susceptible to
rubbing and jiggle-key raking.
Some wafter lock cylinders (especially certain Chicago-brand locks)
are double bitted, with some wafers making contact with the
key at the top of the keyway and others at the bottom. These locks
must be picked at both the top and the bottom, sometimes alternating
between them. Special double-sided jiggle-rake picks are commercially
available for such locks.
Most automotive locks use wafer tumblers. Here, however, tighter
tolerances and, in some cases, high-security secondary mechanisms, are
more common.
Disk Tumbler Locks
Some high security locks, such as those manufactured by Abloy and
Abus, use round disk tumblers that are rotated into position by a
specially designed key bitted with angled cuts corresponding to each
tumbler. These locks are unusual in not requiring springs on the
individual tumblers and are therefore especially well suited to
outdoor use under extreme conditions. In the United States, disk
tumbler cylinders are used primarily for padlocks situated in harsh
environments, especially by public utilities and railroads. They
require special picking tools to manipulate the tumblers and apply
torque.
Lever Tumbler Locks
The commercial lever lock mechanism dates back to the early 19th
century Chubb lock (and, indeed, to well before). It remains in wide
use in certain applications, especially safe deposit locks, safes,
small cabinet locks, and mailbox locks. In many countries, especially
the U.K. and India, they are commonly used for door locks and padlocks
as well. Their security ranges from being quite rudimentary to being
among the most formidable locks in commercial use.
Lever locks employ a set of "lever" tumblers raised to a specific
height by the key bitting. Each lever has a cutout, called a
gate, through which part of the locking bolt, called the
fence or the stump, must travel. Picking these
locks involves putting torque on the locking bolt and raising the
gates to the correct height. As with pin tumbler locks, because the
levers, gates, and fence are slightly out of alignment, it is usually
possible to raise and pick the levers one at time.
Picking lever locks generally requires different tools from those used
for pin tumbler locks, and high security lever locks often require
specialized purpose-made tools.
Combination Locks
Not all locks use a physical key. Combination locks require the user
to "dial in" a secret combination, analogous to a password.
Mechanical combination locks are common on inexpensive padlocks, safe
locks, and to control access to high security vaults. The typical
combination lock design involves a set of (usually three or four) disk
tumblers around a spindle connected to the external dial. Each disk
has a notch cut in its edge. The lock mechanism can open when the
notches on the disks are lined up at a particular rotation. The disks
are connected in sequence via interlocking cams such that one rotation
of the dial engages the first disk, two rotations engage the second,
and so on.
Although combination lock manipulation exploits some of the same kinds
of imperfections as pin tumbler lock picking, the principles and
techniques are quite different and are well beyond the scope of this
document.
Electronic Locks
Inexpensive and low-power embedded micro-controllers are increasingly
serving as the foundation of modern security and access control systems.
Electronic locks, of course, do not have mechanical tumblers and are
so not vulnerable to many of the physical manipulations exploited in
tradtional lock picking. However, that is not to suggest that electronic
locks are inherently more secure than their mechanical counterparts. The
underlying locking mechanism is still mechanical and may be subject to
mechanical bypass. The electronic control mechanism may be vulnerable
to new attacks, e.g., through the introduction of RF or power faults or via
"Tempest" monitoring. And, of course, electronic locks have at their
root software whose size and complexity grows as they become more
sophisticated (and as they are networked into centralized control
systems). There is no reason to believe that the software used in
electronc lock systems is any less subject to bugs, vulnerabilities
and protocol failures than the typical (buggy) software used in other
applications of similar complexity. Indeed, security system
software may well be considerably worse, since it is often
purpose-written and may be subject to only limited scrutiny and
testing.
Now What?
Picking locks very much involves "psychomotor" skill. Understanding
the theory of lock picking is only a small part of being able to
successfully pick locks. The only way to become proficient is to
practice. The training locks in the lab are a good start, but you
will probably learn more quickly if you have access to your own
personal practice locks as well.
Obtain a collection of suitable lock cylinders. Ilco replacement
cylinders are inexpensive and a good compromise between quality and
pick-ability for practice (that's what the training locks here are)
and are available in a many different commonly-used keyways. They
cost between five and eight dollars each from various distributors,
depending on the exact configuration. "Mortise" cylinders can be held
in a small vice for practice and "Rim-type" cylinders can be mounted
easily to a wooden board (which must be between one and two inches
thick). Drill a 1-3/8 inch hole and use the mounting hardware
supplied with the cylinder. You will also need a small re-pinning kit
(available from locksmith suppliers as well as many home improvement
and hardware stores) so you can easily add, remove, and re-arrange
pins. (When you add or remove pins, you must add or remove the entire
pin stack, including the bottom pin, top pin, and spring). See any
text on locksmithing, or http://www.gregmiller.net/locks/disassemble.html,
for basic descriptions of lock pinning.
It is always best to practice with your lock mounted to a door or wood
platform, as they are here, or at least fixed in a vice. When you
hold a cylinder in your hand you get different feedback from the pins
than you do on a real door.
More than anything else success in picking depends on experience and
practice with a range of locks. Over time, accumulate a varied
collection of practice locks, and study different lock designs
whenever you get the opportunity. (For example, see some of the photos of various
locks on my web site.)
All images and text Copyright © 2003 by Matt Blaze.
Please ask before re-using commercially.
Home page is at http://www.mattblaze.org/ .